How to copy screenshot to clipboard in New Apple Mac OS

If you have upgraded your Apple Mac OS to 14.x.x, then you may find it strange that the screenshots are not copied into the clipboard. The screenshots taken are saved to Desktop by default. And also it appears on the bottom right corner for a few seconds so that you can click on that copy image. 

But that is annoying! You find it very inconvenient to click on multiple times to copy the screenshot you just took. 


However, there is a built-in option to copy the screenshot into the clipboard, so that you can paste it anywhere you want. 

To copy the screenshot into the clipboard press hold the Control key also along with COMMND and SHIFT. 

COMMAND + SHIFT + CONTROL + 3  To take a screenshot of the full screen and copy the screenshot into Clipboard. 

COMMAND + SHIFT + CONTROL + 4  To enable drag and drop then take a screenshot of the selected portion and copy the screenshot into Clipboard. 


Apple MacBook Notes strike through Menu option and Setting Keyboard shortcut.

Apple Notes is the probably most widely used App for taking notes on Apple MacBook or Apple Mac in general. In this tutorial, I will show you how to set a keyboard shortcut for Strike Through. 

Even the menu navigation is not easily accessible. You have to reach the 2nd  level of the menu item. And If you are coming from a Windows background, it will even be tricky to find the option in the menu. 

First of all the strike thought option is available Under Format -> Fonts. 

To make it handier, you can set a keyboard shortcut so that, if you are using Notes more often, then it will be very useful. 

Follow these steps to set a keyboard short to strike through in the Mac. It is limited to only the Notes App. 

Go to System Preferences, and select Keyboard. Then select Shortcuts Tab 


Then select App Shortcuts in the left-hand side pane. Then click on the '+' Icon at the bottom center of the menu. 


The new dialog appears. Select the below options. 

For APplication select Notes. As this keyboard shortcut is only applicable for Notes, select Notes. 
For the Menu title type Strikethrough.  This is important and it should match the menu command present in the Notes app. The string should match. 


Finally, select the shortcut command you want to use. Make sure this key combination is available not assigned to any other command. I have selected Shift + Command. + X. Since X kind of matches with the action phonetically and pictorially. It makes sense to use X with other key combinations for strike through


How to create a self signed SSL certificate and how to use it with your web Server.

SSL certificate is the foremost important aspect of any website. If your website is running without SSL, modern browsers will stop the users from entering the website. Of course, there are ways to bypass that, at your own risk. As long as your website has no commercial data exchange, sensitive user information, etc, you are still good to run a website without a proper SSL certificate. For example, a blog can run without an SSL. 

Note that Google AdSense accepts websites without SSL. 

But the topic of this post is about Self Signed SSL certificate. How to create one, how to use it, and where to use it. 

Let us see where to use it. For any website which is used for internal purposes, it's always a good idea to use Self Signed SSL, instead of paying for a real SSL certificate. Internal I mean, within a company, team, or for personal uses, for testing purposes, etc. 

Now, let us see how to create a self-signed SSL certificate. 

What you need

A Linux machine. 

OpenSSL utility 

Apache2 Web Server with a sample website. 


Let us start...

Install prereqs. 

You need to install the mod_ssl to enable httpd or Apache to work with SSL certificates.  I am using CentOS-based Linux, so I will use the yum package manager utility. 

Perform all the steps as a non-root user with sudo permission. 

sudo yum install mod_ssl


This should install the SSL module for the httpd services. Please note that in CentOS it is called httpd whereas in Ubuntu it is called as Apache2. 

The certificate and key will be created under the default location. 

sudo mkdir -p /etc/ssl/private

sudo mkdir -p /etc/ssl/certs


Create the certificate and the private key 

Use the below OpenSSL command to create both the certificate and private key. The one command does create both files. There is no additional step like creating CSR - Certificate Signing Request. Since this is a self-signed certificate, you are not going through the actual process of getting the certificate signed by the CA - Certification Authority. Examples of CA are, Symantec Inc, DigiCert, etc. 


sudo openssl req -x509 -nodes -days 365 -newkey rsa:2048 -keyout /etc/ssl/private/host2-selfsigned.key -out /etc/ssl/certs/host2-selfsigned.crt

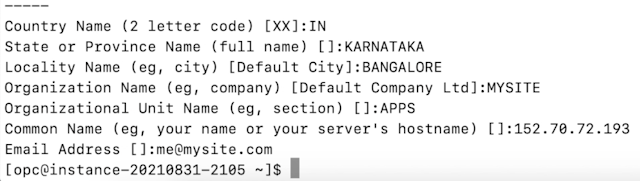
This will go into an interactive screen. It will prompt various inputs. 

Refer to the below screenshot for the inputs I have provided. 


Please note that the CN - Common Name should match your domain, hostname, or IP address, as per your httpd settings for the website. In other words. I have used IP address here. 

If the command is successful, it exits from the OpenSSL interactive session. 

Now check the below locations for certificates. 

For SSL certificate check this location /etc/ssl/certs

For the private key check this location /etc/ssl/private

ls -ltr /etc/ssl/private/

-rw-r--r--. 1 root root 1704 Jun 12 17:09 host2-selfsigned.key


ls -ltr /etc/ssl/certs/


-rw-r--r--. 1 root root 1419 Jun 12 17:09 host2-selfsigned.crt


Configure the New SSL certificates in the Apache server 

Create a new config file under /etc/httpd/conf.d/ to configure the Virtual Host and SSL certificate details. 

I am creating the file with the IP address of my host. 

sudo vi /etc/httpd/conf.d/152.70.72.193.conf

<VirtualHost *:443>
ServerName 152.70.72.193
DocumentRoot /var/www/html
SSLEngine on
SSLCertificateFile /etc/ssl/certs/host1-selfsigned.crt
SSLCertificateKeyFile /etc/ssl/private/host1-selfsigned.key
</VirtualHost>


Now check the config files are valid by running 

sudo apachectl configtest

You should get Success OK status. This confirms that all your config files are correct. 

Now restart your httpd. 

sudo systemctl restart httpd.service

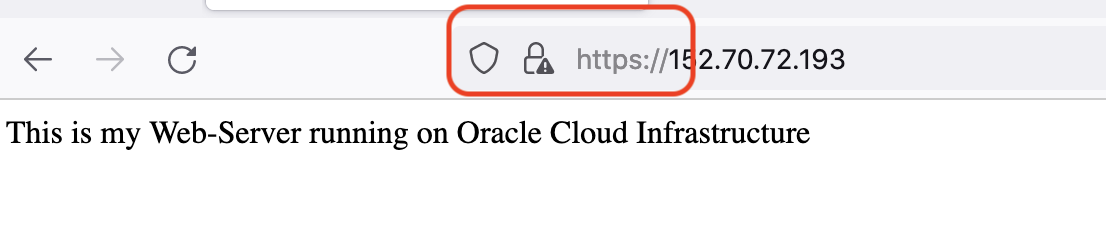
Now access the web application URL  https://152.70.72.193/  

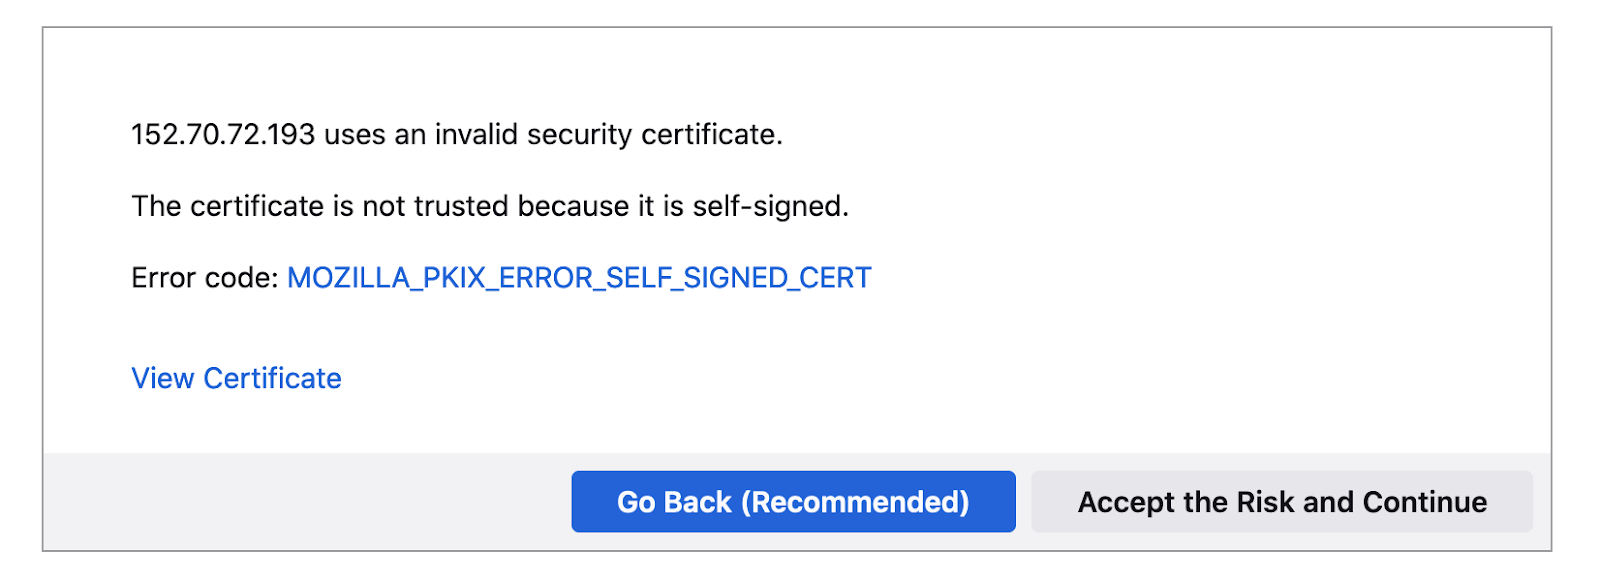
If you are accessing the URL for the first time after the certificates are installed, then you will be warned by the browser. It clearly says the website uses an invalid certificate. 


Once you accept and click on the continue button, the page should load properly as shown below


Notice the HTTPS and exclamatory mark and it indicates that there is an SSL certificate but it is not trusted by the browser. 

If the site is taking longer and then times out, check if the HTTP version is working. If the HTTP version is working then you to check if the firewalls are disabled for HTTPS ports. 

sudo firewall-cmd --add-service=https

If the output of this command is "success" Then it was an issue with the firewall. Now the page should load. 

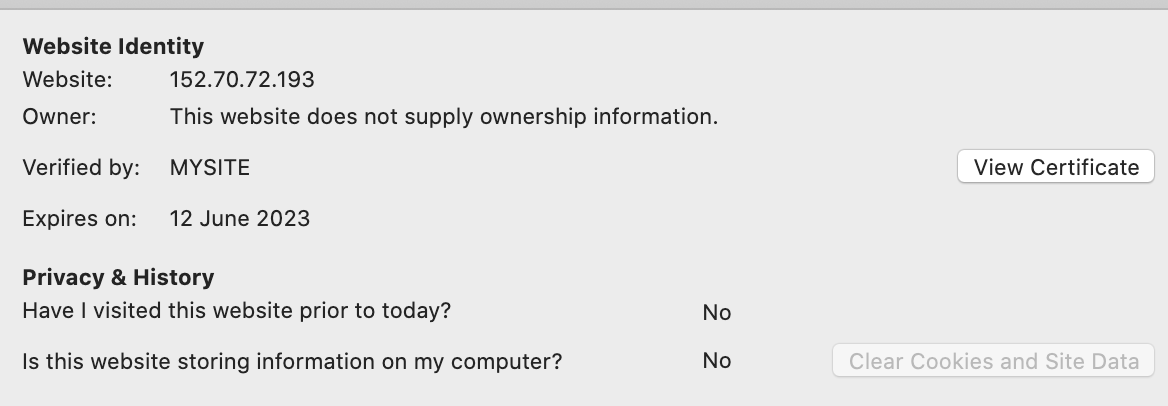
Inspect the certificate from the browser. 

Click on the lock icon on the address bar, it says the connection is not secure. Click on more information and it shows the details of the certificate. 


If you want to see the certificate, click on the view certificate. 


How to set Python3 as default interpreter for VS Code | or set any version as default interpreter.

Want to run your python code with a particular python version in Microsoft VS Code? And, make it the default version?
Read on.
Make sure that the required version is installed. You check the available version and the path by running this command.

I am trying this on Apple Mac. It should be similar in Windows Machines as well.


Open the VS Code, at the bottom of the screen you will Terminal. If it is not visible, Go to View and then select Terminal.


Check the available python versions and their path. 


 % which python  

/usr/bin/python


 % which python2

/usr/bin/python2


 % which python3 

/Library/Frameworks/Python.framework/Versions/3.7/bin/python3


Next, 


Run this python code to check what version is used by default. 


import platform
print(platform.python_version_tuple())
print(type(platform.python_version_tuple()))


You will get this


('2', '7', '16')

<type 'tuple'>


Now you know the path and versions available.

In the VS code, go to the View menu and select Command Pallete


Now search for Python and you will get all the installed versions of Python.


Then select Python: Select interpreter. You will get all the installed versions of python. Select the one you want to be associated with your script.


Now run the same code again to check what is the default version set.


import platform
print(platform.python_version_tuple())
print(type(platform.python_version_tuple()))


('3', '7', '1') <class 'tuple'>


SOLVED | AdSense Approval Issues and Fixes for Site down or Unavailable | How to Fix

I tried to get an AdSense approval for my site but I got a mail from AdSense saying the site is down or unavailable. But the site is definitely accessible and all the other requirements are taken care of. The site is also very old and the domain itself is 3 years old. There are no issues with page views as well. 


Here is my situation.

I have an approved AdSense for YouTube. I got my blogger site upgrade to a top-level domain. This is the requirement to link your YouTube AdSense to your blogger site.  

I have taken care of all the requirements to apply for the AdSense for my site. 

1. Clean design and unique content. No issue with the design as I have created it using a blogger theme. 

2. About page, Contact Us Page, Privacy Policy Page. These are mandatory 

3. Top-Leve Domain


After applying for the AdSense I got the denial mail and looking at the reason, I was convinced that there must be a small mistake in the Domain setup or blogger settings.   

I tried these things and found the culprit. 

Make sure to check all these steps so that you will not get another denial. 


1. Check if the site is accessible with different combinations of WWW, HTTP and HTTPS 

krishtalk.com

www.krishtalk.com

https://www.krishtalk.com

http://www.krishtalk.com

Note that my site still runs without HTTPS, yet to add SSL certificate.  

All these combinations worked. 

So no issues at this point. 


2. Check the DNS settings from your Domain service provider. All CNAME settings were found to be good. Going wrong here has less chances,  if there are any issues with your domain settings, your site may not be accessible. 

So no issues found yet. 


3. Check if you have custom rebots.txt enabled 

This is one of the major reasons why approval is denied. Check the settings of your blog or you can just check the content of your robots.txt by appending robots.txt to the domain URL

http://www.krishtalk.com/robots.txt

Make sure that your robots.txt is not blocking any of the Google servers. 

This is the default robots.txt from my site. 

User-agent: Mediapartners-Google
Disallow: 

User-agent: *
Disallow: /search
Allow: /

Sitemap: http://www.krishtalk.com/sitemap.xml

checked my blogger settings and custom robots was turned off. 


This is also clean and not the culprit for my approval denial. 


4. Upload your sitemap to Google. 

I had done this before but, I did upload the sitemap.xml again. I am not sure if this will cause any issues. As long as your pages are searched from Google and you are getting the views then this should not be a problem. 

I do not think this was a problem for my site. 


5. While configuring your custom domain you might have selected the option "Redirect Domain". 

You will get an option to redirect your non-www site to www site under the Publishing tab of your blogger settings.  

like  krishtalk.com to www.krishtalk.com


When I checked this setting, it was turned on. I guessed this could be the issue. Since we are providing the non-www site while applying for AdSense. It is better to turn off this redirection. So Google can find and navigate the www site.

My guess was right. After changing this setting,  I again applied for review. After 2 days, I checked the status and it was approved. :) 


Thank you and let me know what worked for you. 


Notes: If you are applying for the AdSense for the first time for your blogger site, then you have to do it from within the blogger's earnings tab. 

If you already have an approved AdSense then you have to have a custom domain and from the AdSense account login, you have to apply for the site approval. 


How to create MS Word document automatically with Excel

MS Word and Excel can do wonders together.  You can do a lot of automation using these 2 applications for your small and medium businesses.  Here is one such solution.  

Generating the MS word report automatically using excel as a data source. Mail merge is used to link data from excel to word. Then a simple macro is used to get the desired record from Excel Spreadsheet.

Download the MS word document and Excel spreadsheet used in this video here

https://drive.google.com/drive/folders/0B4UB3eOhhY26TVdvQ3RucW1zb1E?resourcekey=0-YcGX4_XdYqt_C_dSztvA_A&usp=sharing

Please use this link

https://drive.google.com/drive/folders/0B4UB3eOhhY26TVdvQ3RucW1zb1E?resourcekey=0-YcGX4_XdYqt_C_dSztvA_A&usp=share_link

If you are not able to access this link, let me know. The link in my YouTube channel was not working, now I have uploaded the files here. 

[SOLVED] MacBook Pro keyboard backlight not working? Check this post

Keyboard backlight not working on your MacBook Pro? And your Mac has a touch bar? 

Continue reading...

MacBook Pro 2020 which comes with a touch bar has moved its Keyboard backlight controls to the touch bar. You will not see any control on the screen under the Keyboard settings. But the setting in the touch bar is also not easy to see and it bit tricky. You most probably, think that there is some issue with Keyboard. Even the support people suggest resetting some of the settings. That is what happened with my case. Luckily I found a way to change the settings. 


By default, the Keyboard backlight settings are not visible on the touch bar. You have to expand the tra-like stuff on the touch bar and then you will find icons, which look similar to screen brightness control icons. 

On the right side of your touch bar, you will these 4 controls

1. Screen Brightness control 

2. Volume control 

3. Mute control 

4. Siri button. 

Left these controls there is an arrow button which looks like '<', by clicking on this, you will see more controls. 


Once you click on the left arrow mark as shown in the above picture, it will open up more controls. 

At the center of the touch bar, you will see controls that look similar to Screen Brightness controls. You can use these to adjust the backlight of the Keyboard. 

How to copy screenshot to clipboard in New Apple Mac OS

If you have upgraded your Apple Mac OS to 14.x.x, then you may find it strange that the screenshots are not copied into the clipboard. The s...